Many people use hair extensions to add volume, length, and even texture to their natural hair. There are many hair extensions out there. They range from weft to clip-ins, to tape-ins, and recently the beaded weft. Beaded weft extensions have been in trend for quite some time now. Yet, many people still do not know much about it. In this article, we will share with you the differences between beaded weft extensions and I-tip hair extensions.
What are I-tip hair extensions?
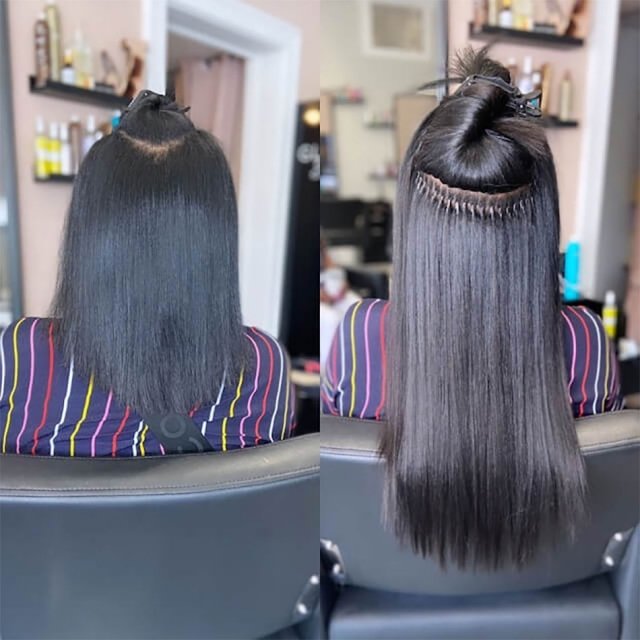
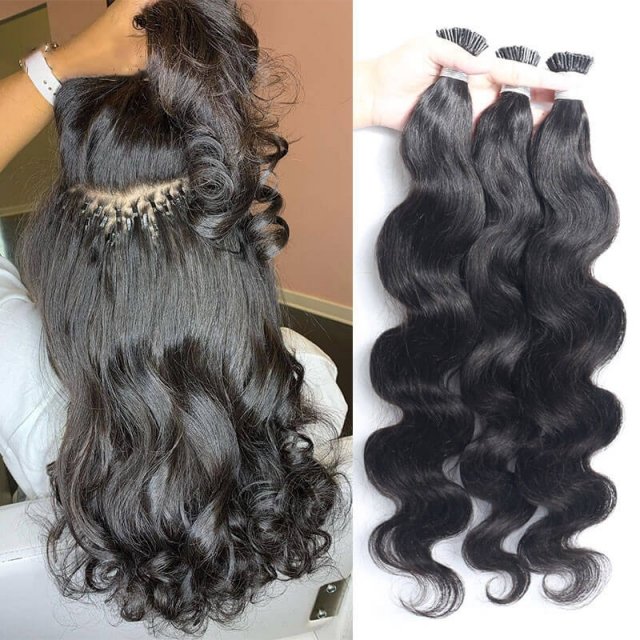
Microlink extensions (also known as micro rings and microbeads) come with small silicone beads or tubes on top which are used to attach hair extensions. This extension method requires no glue, no adhesive, and no heat but some special tools, such as a hair plier, etc. That’s also why Microlinks can’t be DIYed. But it’s still a relatively safe and healthy method to add length and volume to natural hair.
What are beaded wefts?
Beaded weft (or beaded extensions) are hair extensions in which the hair is sewn to a horizontal strip known as a weft. Using this hair extension, your stylist sandwiches the extension between your natural hair. Then, they secure it with a microbead at the root. Hence, it is sometimes called microlink extensions or microbead extensions. But, in recent times, these beaded weft extensions come with beads attached to the weft. And this makes installation easier. Their method of installation makes them safe options compared to other extensions.
Benefits of beaded hair extensions.
Quality weft hair extensions with microbeads offer you the styling option you desire. Here are some benefits of getting beaded weft extensions:
- It offers plenty of comfort.
When installed properly, beaded weft extensions offer superior comfort. This is because they are quite lightweight. So, you won’t even feel the tension of having an extension on your head. And when you do not weigh your strands, the probability of experiencing damage is low.
- Blends well with your hair
Another benefit of microlink extensions is that it blends well with your hair. The beads on the weft extension are super tiny, so you won’t even feel they are there.
- Ideal for different lifestyles
Some extensions slip off when you wear them to the gym. This is not so in the case of beaded extensions. You can wear them to the gym and go ahead with your active lifestyle without the fear of the extensions damaging your natural tresses.
- Offers versatile styling option
Another thing that we love about microbead extensions is their versatile styling options. For instance, if you want to try out highlights without bleach or dye, you can get beaded extensions. Besides, the fact that they blend well with your hair means that you can style it any way you want. You can go for a half-up half-down style, or opt for whatever parting style you prefer. With beaded extensions, the styling options are limitless.
Benefits of getting microlinks
- Seamless and undetectable:
The beads and tubes on the top of microlinks are very small and are dyed into the color of hair extensions, which are undetectable after being installed. And microlinks are attached to your natural hair strand by strand so that the extensions blend perfectly with your hair. What’s more, with microlinks, you don’t have to braid full-head cornrows, which results in an undetectable flatter look.
- Airy and lightweight:
Microlink extensions are applied to relaxed natural hair. You don’t need to braid your hair or wear a cap, which results in a breathable and comfortable wearing experience.
- No glue or chemicals are needed:
The installation and removal of microlink extensions require no glue, no adhesive, no chemicals, and no heat, which makes it a safe and healthy way to add length and volume to natural hair. And it’s also a suitable option for those who suffer from a sensitive scalp.
- Even weight distribution:
We know that no matter which type of extension you opt for, they do bring some pressure and strain to the scalp and natural hair. And suffering from constant pressure can lead to hair damage. Unlike other hair extensions, micro links are applied strand by strand. Although this installation method takes more patience and energy, the strain is distributed equally, which causes less harm to the natural hair and scalp. And you won’t feel microlink tight, they are a low-tension method to add hair length.
- Longer-lasting:
With tape-ins, you may need to go back to the salon to make some upkeep and reinstall every 4-6 weeks. Microlinks can stay on the head a bit longer than tape-ins. We recommend you retighten or reposition the microlinks every 8-12 weeks.
- Reusable:
If your microlinks are of high quality, with proper maintenance, they should last for more than one year. And microlink extensions can be reused for about 4-5 applications.
- Easy access to the scalp and natural hair:
Microlinks are attached to totally relaxed natural hair, so you have easy access to your natural hair and scalp to perform daily care.
Beaded weft extensions vs. I-tip extensions
Because both beaded weft and I-tip hair extensions need microbeads for installation, many people think they are the same. They are not! For beaded weft hair extensions, the hair is sewn into a beaded weft. But, I-tips are individual strands of hair and are not sewn into a weft. The only similarity that both extensions have is their method of installation. However, they are both durable, and you can reuse them. The type of result you are looking for will inform your choice of extension. If you are looking to add volume to your hair, then beaded weft extensions are your most suitable option. But if you want to highlight your hair without dying it, I-tip extensions are your best bet. All in all, they are both high-quality extensions that are worth their price.
How to install beaded wefts?
To install the beaded weft, you need some items. They include:
- Beaded weft extension
- Crochet hook
- Microbead plier
- Rattail comb
- Sectioning clips
- Hair Velcro tapes
- Hair spray
Here is the step-by-step process on how to install beaded weft extensions:
Step 1: Wash and dry your hair
To get the most out of your beaded weft extension, you need to start with clean hair. So wash your hair with shampoo to get rid of any product buildup. Condition your hair to keep it hydrated, and air dry it, or use a blow dryer on cool heat settings. Make sure you detangle your hair to remove any major knots or tangles.
Step 2: Section your hair
The next step is to part your hair horizontally into two sections. You can section it in a U-shape from ear to ear. Then use an elastic band to secure each section.
Step 3: Install the microbead extensions
Starting with the back section, separate a portion in a U-shape near the nape of your neck. Use the hair velcro tape to hold down the remaining hair. This is to ensure that the parting line is neat. Pick up your extension and measure it on the part you sectioned out. Leave about 1 or 1½ inches of hair at the sides so the extension will be invisible. Then cut out the extension weft you measured and set the remaining extension aside.
Pick up the crochet needle and place the weft hair extensions with microbeads on your hair. With the crochet needle, pick out tiny strands of your hair. Then gently pull it through the beads on the extension. Once the beaded extension is close to the root of your hair, clamp down the beads with a plier. Then move to the next strand. Repeat this process for other sections until you have successfully installed the beaded extensions.
Step 4: Spray and style
After installation, spray some hairspray on the hair and comb it. And then style as desired.
Final Thoughts
We believe you now know all there is to know about beaded weft extensions. To get your weft hair extensions with microbeads, visit TradingHair. TradingHair wholesales human hair extensions in various textures, colors, and lengths. No matter if you are searching for DIY available tape-in hair extensions for black hair, or quick volume boost clip-in hair extensions, we’ve got you covered.
Related Posts:
How To Install And Remove Microlinks?
