
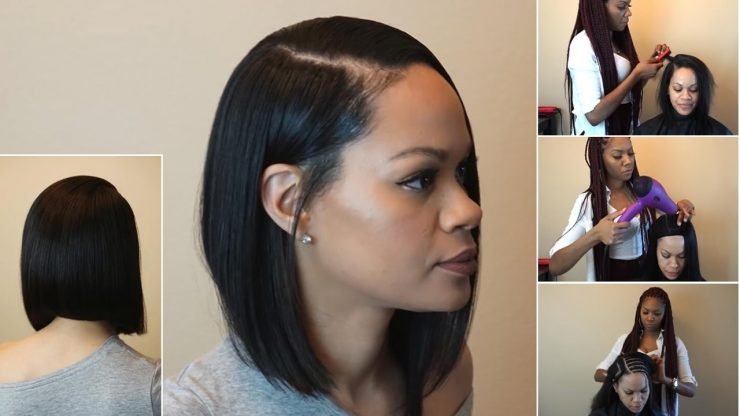
A quick weave is quite an easy way to volume your hair look in a short time. You can choose to apply a quick weave at a salon or at home. It’s no doubt that a coin-saving option to make a quick weave by yourself. We’re gonna show you how to make a quick weave naturally and safely.
Tutorial to make a quick weave step by step
Here are some things you need to prepare before installing quick weave:
Human hair bundles (3-4 bundles, remember to choose hair weaves that have a similar color and pattern to your natural hair)
Bonding glue
Two wig caps
Scissors
A wide-tooth comb
Thread and needle (optional, remember to choose a thread color that is close to the hair weave)
Lace closure (optional)
A mannequin head (option)
Clips and t-pins (optional)
- Step 1: Sew in lace closure (optional)
If you want to create a more natural appearance, sewing in an invisible lace closure to the wig cap before making a quick weave is a sensible idea. Human hair quick weave with a lace closure provides a natural illusion that looks like the hair strands are growing from your scalp.
Put the wig cap on the mannequin head and use t-pins to fix the lace closure to the wig cap. Use thread and needle to sew in the lace closure to the wig cap. Turn the cap inner out and cut a portion of the cap under the lace closure.
- Step 2: Prepare your natural hair
Shampoo your natural hair and blow it dry thoroughly. Then, braid your natural hair into cornrows and make them as flat as possible. Clean your natural hair deeply before installing a wig or hair extensions can help to protect your natural hair from bacterial growth.
- Step 3: Put on the wig caps
Put on a wig cap and stretch it to cover your natural hair. You can choose to leave some front hair out apart to make a natural hairline later. And then put on another wig cap to cover the previous one. The purpose to put two wig caps on is to prevent your natural hair from reaching the glue directly. This can help to protect against the risk of hair loss.
- Step 4: Glue on human hair weaves
Start from the nape of your neck, measure the track around the back of your head. Cut the track of the hair weft and blond it to the wig cap. Once you finish bonding a track wait for 5-7 seconds to leave the glue dry. Allow each track to dry after bonding before applying the next track. Repeat the steps above to bond all hair weaves to the wig cap. After you finish a full head quick weave, wait for about 1 hour to let the glue dry completely before restyling.
- Step 5: Comb and restyle
Loosen your leave-out hair and comb the hair so that the hair strands blend naturally with your natural hair. Human hair quick weave allows you to restyle any hairstyles you desire.
We hope that, after reading this post, you can learn all skills about how to make a quick weave with no damage.
If you are searching for affordable and quality-assured human hair bundles for a quick weave, please put the China Hair Vendor on your list. China Hair Vendor bulk supplies cheap human hair bundles with extraordinary quality. All our human hair bundles are made of 100% human hair, soft, smooth, and bouncy, with a natural luster and natural appearance. Order real human hair bundles from China hair Vendor, so you don’t need to worry about the quality and lifespan of the products. Apart from quality-guarantee human hair weaves, China Hair Vendor also offers various types of human hair wigs for wholesale, including headband wig, lace front wig, t part wig, u part wig, 360 wigs, etc. Welcome to choose from different hairstyles, colors, and lengths. Our catalog has covered all human hair products. Feel free to drop us a message anytime if you have doubts about how to start or boost your hair business. We’re pleased to help you.
Related Read:
